How to Build a CRUD App With Kotlin and Android Studio

Chapter 12 Menu Item ”Persons”

In this chapter we want to realise the display of persons, which is shown when the user taps the menu item ”Persons” in the main menu. The display is done in a separate fragment PersonsFragment.kt, whose user interface (UI) is defined in the layout file fragment_persons_list.xml. Similar to fragment_genders_list.xml, this XML file essentially consists of a RecyclerView element that fills its contents with the help of the additional layout file person_item.xml and the adapter PersonItemAdapter.kt. The file is slightly more complex since we add a couple of attributes to the name, especially a picture of the person. As with genders, parallel to the fragment PersonsFragment.kt we also create a ViewModel PersonsListViewModel.kt. As already familiar from the previous chapters, we again have to extend existing code files. Let’s start with the view model:

12.1 PersonsListViewModel.kt

Listing 67: PersonsListViewModel.kt
package app.gedama.tutorial.cruddiary.viewmodel
import androidx.lifecycle.LiveData
import androidx.lifecycle.ViewModel
import androidx.lifecycle.ViewModelProvider
import androidx.lifecycle.switchMap
import app.gedama.tutorial.cruddiary.GlobalAppStore
import app.gedama.tutorial.cruddiary.dao.PersonDao
import app.gedama.tutorial.cruddiary.data.Person
class PersonsListViewModel(personDao: PersonDao) : BaseViewModel()  {
    private val showDeactivated = GlobalAppStore._showInactive
    val persons: LiveData<List<Person>>
    init {
        persons = showDeactivated.switchMap { showDeactivated ->
            personDao.getAllPersons(1L, showDeactivated)
        }
    }
}
class PersonsListViewModelFactory(private val personDao: PersonDao) : ViewModelProvider.Factory {
    override fun <T : ViewModel> create(modelClass: Class<T>): T {
        if (modelClass.isAssignableFrom(PersonsListViewModel::class.java)) {
            return PersonsListViewModel(personDao) as T
        }
        throw java.lang.IllegalArgumentException("Unknown ViewModel")
    }
}

This code should look familiar to you: we define the LiveData variable persons, which returns all persons contained in the database. The value 1L is passed to the getAllPersons() method so that the dummy value ”—” is not displayed in our RecyclerView. And depending on the variable showDeactivated, deactivated persons are displayed or not.

And as with GendersListViewModel, the ViewModelFactory PersonsListViewModelFactory is defined in the same file, which gets our PersonDao class as a parameter, so that we can access the database in the ViewModel.

Next, we extend our light mode theme, defining an id called no_entries_text_id and a style called CrudDiary_NoEntries which are used to display a note at the start of the persons list in case no persons have been stored in the database yet. We are also adding a few more styles for displaying our persons list:

12.2 themes.xml (Light-Mode)

Listing 68: themes.xml (Dark-Mode)
<resources xmlns:tools="http://schemas.android.com/tools">
    <drawable name="saveItemButtonIcon">@drawable/baseline_save_24</drawable>
    <drawable name="deactivateItemButtonIcon">@drawable/baseline_do_not_disturb_alt_24</drawable>
    <drawable name="deleteItemButtonIcon">@drawable/baseline_delete_24</drawable>
    <item type="id" name="no_entries_text_id" />
    <!-- Base application theme. -->
    <style name="Theme.CrudDiary" parent="Theme.MaterialComponents.DayNight.NoActionBar">
        <!-- Primary brand color. -->
        <item name="colorPrimary">@color/purple_500</item>
        <item name="colorPrimaryVariant">@color/purple_700</item>
        <item name="colorOnPrimary">@color/white</item>
        <!-- Secondary brand color. -->
        <item name="colorSecondary">@color/teal_200</item>
        <item name="colorSecondaryVariant">@color/teal_700</item>
        <item name="colorOnSecondary">@color/black</item>
        <!-- Status bar color. -->
        <item name="android:statusBarColor">?attr/colorPrimaryVariant</item>
        <!-- Customize your theme here. -->
        <item name="active_background_color">@color/white</item>
        <item name="inactive_background_color">@color/colorLightGrey</item>
        <item name="main_user_color">@color/teal_700</item>
        <item name="regular_user_color">@color/black</item>
        <item name="fab_tint_background">@color/teal_700</item>
        <item name="fab_border_color">@color/teal_700</item>
        <item name="fab_icon_color">@color/white</item>
    </style>
    <attr name="active_background_color" format="reference" />
    <attr name="inactive_background_color" format="reference" />
    <attr name="fab_tint_background" format="reference" />
    <attr name="fab_border_color" format="reference" />
    <attr name="fab_icon_color" format="reference" />
    <attr name="main_user_color" format="reference" />
    <attr name="regular_user_color" format="reference" />
    <style name="CrudDiary_LinearLayoutCompat" parent="Theme.CrudDiary">
        <item name="android:layout_width">match_parent</item>
        <item name="android:layout_height">wrap_content</item>
        <item name="android:clipToPadding">false</item>
        <item name="android:orientation">vertical</item>
        <item name="android:padding">0dp</item>
        <item name="divider">@drawable/divider</item>
        <item name="showDividers">middle</item>
    </style>
    <style name="CrudDiary_TextInputLayout" parent="Widget.MaterialComponents.TextInputLayout.OutlinedBox">
        <item name="android:layout_width">match_parent</item>
        <item name="android:layout_height">wrap_content</item>
        <item name="android:layout_marginBottom">10dp</item>
    </style>
    <style name="CrudDiary_LinearLayoutCompat_CardView" parent="Widget.MaterialComponents.CardView">
        <item name="android:layout_width">match_parent</item>
        <item name="android:layout_height">wrap_content</item>
        <item name="android:layout_margin">8dp</item>
        <item name="cardElevation">4dp</item>
        <item name="cardCornerRadius">4dp</item>
    </style>
    <style name="CrudDiary_LinearLayoutCompat_CardView_Single_Text" parent="Theme.CrudDiary">
        <item name="android:layout_width">match_parent</item>
        <item name="android:layout_height">wrap_content</item>
        <item name="android:minHeight">50dp</item>
        <item name="android:gravity">center_vertical</item>
        <item name="android:textStyle">bold</item>
        <item name="android:padding">8dp</item>
        <item name="android:textSize">16sp</item>
    </style>
    <style name="CrudDiary_LinearLayoutCompat_CardView_Text" parent="Theme.CrudDiary">
        <item name="android:layout_width">0dp</item>
        <item name="android:layout_height">wrap_content</item>
        <item name="android:layout_gravity">fill_horizontal|start</item>
        <item name="android:padding">8dp</item>
        <item name="android:textSize">16sp</item>
        <item name="android:layout_row">1</item>
        <item name="android:layout_column">0</item>
    </style>
    <style name="CrudDiary_LinearLayoutCompat_CardView_Title" parent="CrudDiary_LinearLayoutCompat_CardView_Text">
        <item name="android:textStyle">bold</item>
        <item name="android:layout_row">0</item>
    </style>
    <style name="CrudDiary_LinearLayoutCompat_CardView_Image" parent="Theme.CrudDiary">
        <item name="android:layout_width">70dp</item>
        <item name="android:layout_height">70dp</item>
        <item name="android:minWidth">70dp</item>
        <item name="android:layout_gravity">center_vertical</item>
        <item name="android:padding">8dp</item>
        <item name="android:adjustViewBounds">true</item>
        <item name="android:layout_row">0</item>
        <item name="android:layout_column">1</item>
        <item name="android:layout_rowSpan">2</item>
        <item name="android:contentDescription">@string/item_image_description</item>
    </style>
    <style name="CrudDiary_LinearLayoutCompat_CardView_Grid" parent="Theme.CrudDiary">
        <item name="android:layout_width">match_parent</item>
        <item name="android:layout_height">wrap_content</item>
        <item name="android:rowCount">2</item>
        <item name="android:columnCount">2</item>
        <item name="android:orientation">horizontal</item>
    </style>
    <style name="CrudDiary_InactivityCheckbox" parent="Theme.CrudDiary">
        <item name="android:layout_width">wrap_content</item>
        <item name="android:layout_height">wrap_content</item>
        <item name="android:layout_gravity">center</item>
        <item name="android:text">@string/inactive_label</item>
        <item name="android:visibility">gone</item>
    </style>
    <style name="CrudDiary_Button" parent="Widget.MaterialComponents.Button.OutlinedButton">
        <item name="android:minHeight">60dp</item>
        <item name="android:layout_width">wrap_content</item>
        <item name="android:layout_height">wrap_content</item>
        <item name="android:layout_gravity">center</item>
    </style>
    <style name="CrudDiary_Button.SaveItem">
        <item name="android:text">@string/save_button</item>
        <item name="icon">@drawable/saveItemButtonIcon</item>
    </style>
    <style name="CrudDiary_Button.DeactivateItem">
        <item name="android:text">@string/deactivate_button</item>
        <item name="icon">@drawable/deactivateItemButtonIcon</item>
    </style>
    <style name="CrudDiary_Button.DeleteItem">
        <item name="android:text">@string/delete_button</item>
        <item name="icon">@drawable/deleteItemButtonIcon</item>
    </style>
    <style name="CrudDiary_NoEntries" parent="Theme.CrudDiary">
        <item name="android:layout_width">match_parent</item>
        <item name="android:layout_height">wrap_content</item>
        <item name="android:layout_gravity">start</item>
        <item name="android:visibility">gone</item>
        <item name="android:padding">8dp</item>
    </style>
    <style name="ToolbarTheme" parent="ThemeOverlay.MaterialComponents.Dark.ActionBar">
        <item name="android:textColor">@color/black</item>
    </style>
</resources>

As usual, we need a couple of additional strings in our string.xml files:

Listing 69: string.xml (English)
...

Next, we define the layout file person_item.xml:

12.3 person_item.xml

Listing 70: person_item.xml
<?xml version="1.0" encoding="utf-8"?>
<layout
    xmlns:android="http://schemas.android.com/apk/res/android"
    xmlns:tools="http://schemas.android.com/tools">
    <data>
        <variable
            name="person"
            type="app.gedama.tutorial.cruddiary.data.Person" />
    </data>
    <com.google.android.material.card.MaterialCardView
        android:id="@+id/cardView"
        style="@style/CrudDiary_LinearLayoutCompat_CardView" >
        <GridLayout
            style="@style/CrudDiary_LinearLayoutCompat_CardView_Grid">
            <TextView
                android:id="@+id/person_name"
                style="@style/CrudDiary_LinearLayoutCompat_CardView_Title"
                tools:text="Radelsdrüberunterberger Hummenthaler, Susanne"
                android:text="@{person.name}"/>
            <ImageView
                android:id="@+id/image"
                style="@style/CrudDiary_LinearLayoutCompat_CardView_Image"
                android:contentDescription="@string/item_image_description"
                tools:src="@tools:sample/avatars"/>
            <TextView
                android:id="@+id/person_birthdate"
                style="@style/CrudDiary_LinearLayoutCompat_CardView_Text"
                android:text="@{person.birthDateAsString}"/>
    </GridLayout>
    </com.google.android.material.card.MaterialCardView>
</layout>

The layout file person_item.xml defines how our person elements from the database are displayed in the RecyclerView. For this purpose, we use a CardView that is visually equipped by means of styles previously defined in themes.xml. In comparison to gener_item.xml, we show more information about each person: the name, an (optional) image, and the person’s birthdate. The data binding variable person is defined by means of the data-element, which we access a little further down in the code for our PersonItemAdapter.

12.4 fragment_persons_list.xml

Listing 71: fragment_persons_list.xml
<?xml version="1.0" encoding="utf-8"?>
<layout
    xmlns:android="http://schemas.android.com/apk/res/android"
    xmlns:app="http://schemas.android.com/apk/res-auto"
    xmlns:tools="http://schemas.android.com/tools"
    tools:context="app.gedama.tutorial.cruddiary.fragment.PersonsListFragment">
    <data>
        <variable
            name="viewModel"
            type="app.gedama.tutorial.cruddiary.viewmodel.PersonsListViewModel" />
    </data>
    <LinearLayout
        android:layout_width="match_parent"
        android:layout_height="match_parent"
        android:orientation="vertical">
        <TextView
            android:id="@id/no_entries_text_id"
            style="@style/CrudDiary_NoEntries"
            tools:visibility="visible"
            android:text="@string/no_entries" />
        <androidx.recyclerview.widget.RecyclerView
            android:id="@+id/persons_list"
            android:layout_width="match_parent"
            android:layout_height="0dp"
            android:layout_weight="1"
            android:gravity="top"
            app:layoutManager="androidx.recyclerview.widget.LinearLayoutManager" />
    </LinearLayout>
</layout>

In fragment_persons_list.xml, a RecyclerView is used to display our persons. As mentioned above, we also define a text view for displaying an empty list info in case there have no persons been stored in the database yet. By means of the data-element, the variable viewModel is defined, which we access in the code in our fragment FragmentPersonsList.kt, which we will deal a bit later. Next we tackle the adapter for our persons list. Since we will use the Picasso framework for handling images in our recycler views, let’s first extend our build.xml file:

12.5 build.xml (App)

Listing 72: build.xml
...
    implementation ’io.github.reactivecircus.flowbinding:flowbinding-android:1.2.0’
    // picasso is for correctly handling images and caching in recyclerviews
    implementation ’com.squareup.picasso:picasso:2.8’
    testImplementation ’junit:junit:4.13.2’
...
}

Now we’re ready to define our adapter, which implements the Filterable interface, since we want to demonstrate the capability of searching in a recycler view:

12.6 PersonItemAdapter.kt

Listing 73: PersonItemAdapter.kt
package app.gedama.tutorial.cruddiary.adapter
import android.util.TypedValue
import android.view.LayoutInflater
import android.view.ViewGroup
import android.widget.Filter
import android.widget.Filterable
import androidx.core.content.ContextCompat
import androidx.lifecycle.LiveData
import androidx.lifecycle.MutableLiveData
import androidx.recyclerview.widget.DiffUtil
import androidx.recyclerview.widget.ListAdapter
import androidx.recyclerview.widget.RecyclerView
import app.gedama.tutorial.cruddiary.GlobalAppStore
import app.gedama.tutorial.cruddiary.R
import app.gedama.tutorial.cruddiary.data.Person
import app.gedama.tutorial.cruddiary.databinding.PersonItemBinding
import com.squareup.picasso.Picasso
import java.io.File
class PersonItemAdapter(val clickListener: (personId: Long) -> Unit): ListAdapter<Person, PersonItemAdapter.PersonItemViewHolder>(PersonDiffItemCallback()),
    Filterable {
    private var list = mutableListOf<Person>()
    var _adapterSize = MutableLiveData(1)
    val adapterSize: LiveData<Int>
        get() = _adapterSize
    override fun onCreateViewHolder(parent: ViewGroup, viewType: Int): PersonItemViewHolder =
        PersonItemViewHolder.inflateFrom(parent)
    override fun onBindViewHolder(holder: PersonItemViewHolder, position: Int) {
        val item = getItem(position)
        holder.bind(item, clickListener)
    }
    override fun onCurrentListChanged(
        previousList: MutableList<Person>,
        currentList: MutableList<Person>
    ) {
        super.onCurrentListChanged(previousList, currentList)
        _adapterSize.value = currentList.size
    }
    // see https://stackoverflow.com/questions/65950521/how-to-use-filterable-in-listadapter-using-kotlin
    fun setData(list: MutableList<Person>?){
        this.list = list!!
        submitList(list)
    }
    override fun getFilter(): Filter {
        return customFilter
    }
    private val customFilter = object : Filter() {
        override fun performFiltering(constraint: CharSequence?): FilterResults {
            val filteredList = mutableListOf<Person>()
            if (constraint == null || constraint.isEmpty()) {
                filteredList.addAll(list)
            } else {
                for (item in list) {
                    if (item.name.lowercase().contains(constraint.toString().lowercase()) ||
                        item.birthDateAsString.lowercase().contains(constraint.toString().lowercase())
                    ) {
                        filteredList.add(item)
                    }
                }
            }
            val results = FilterResults()
            results.values = filteredList
            return results
        }
        override fun publishResults(constraint: CharSequence?, filterResults: FilterResults?) {
            submitList(filterResults?.values as MutableList<Person>)
        }
    }
    class PersonItemViewHolder(val binding: PersonItemBinding) : RecyclerView.ViewHolder(binding.root) {
        companion object {
            fun inflateFrom(parent: ViewGroup) : PersonItemViewHolder {
                val layoutInflater = LayoutInflater.from(parent.context)
                val binding = PersonItemBinding.inflate(layoutInflater, parent, false)
                return PersonItemViewHolder(binding)
            }
        }
        fun bind(item: Person, clickListener: (personId: Long) -> Unit) {
            binding.person = item
            if ( item.personId == GlobalAppStore.mainUserId ) {
                val typedValue = TypedValue()
                binding.root.context.theme.resolveAttribute(R.attr.main_user_color, typedValue, true)
                binding.cardView.strokeColor = typedValue.data
                binding.cardView.strokeWidth = 5
            } else {
                val typedValue = TypedValue()
                binding.root.context.theme.resolveAttribute(R.attr.main_user_color, typedValue, true)
                binding.cardView.strokeColor = typedValue.data
                binding.cardView.strokeWidth = 1
            }
            binding.root.setOnClickListener {
                clickListener(item.personId)
            }
            if (item.imagePath.isNotBlank()) {
                val img = Picasso.get().load(File(binding.root.context.filesDir, item.imagePath))
                img?.into(binding.image)
            } else {
                binding.image.setImageBitmap(null)
            }
            if (item.inactive) {
                val typedValue = TypedValue()
                binding.root.context.theme.resolveAttribute(R.attr.inactive_background_color, typedValue, true)
                binding.cardView.setCardBackgroundColor(typedValue.data)
            } else {
                val typedValue = TypedValue()
                binding.root.context.theme.resolveAttribute(
                    R.attr.active_background_color, typedValue, true)
                binding.cardView.setCardBackgroundColor(typedValue.data)
            }
        }
    }
}
class PersonDiffItemCallback : DiffUtil.ItemCallback<Person>() {
    override fun areItemsTheSame(oldItem: Person, newItem: Person) = (oldItem.personId == newItem.personId)
    override fun areContentsTheSame(oldItem: Person, newItem: Person) = (oldItem == newItem)
}

We have to override a couple of methods for fullfilling the Filterabel interface. Mostly, this code has been adapted from a posting on stackoverflow.com. The method performFiltering() in the customFilter variable is defined in a way that only persons are returned whose name or birthdate match the passed constraint char sequence. The bind method is similar to the adapter for genders, however we additionally check, if the person is identical to the main user (who can be set in the settings menu which we will cover in a later chapter). If the person equals the main user, we highlight this person by using an increased border stroke width and a different border color. And we check, if an image is available for the person in which case we use the Picasso framework for displaying the given picture.

Next, we need a new variable someFilterableAdapter in our GlobalAppStore:

12.7 GlobalAppStore.kt

Listing 74: GlobalAppStore.kt
        val showInactive: LiveData<Boolean>
            get() = _showInactive
        var someFilterableAdapter: Filterable? = null
    }
}

In this variable we store the current adapter object so (which implements the Filterable interface) that we can refer to it in our search box. Next, we look at our persons list fragment:

12.8 FragmentPersonsList.kt

Listing 75: FragmentPersonsList.kt
package app.gedama.tutorial.cruddiary.fragment
import android.os.Bundle
import android.view.LayoutInflater
import android.view.View
import android.view.ViewGroup
import androidx.lifecycle.Observer
import androidx.lifecycle.ViewModelProvider
import androidx.navigation.fragment.findNavController
import app.gedama.tutorial.cruddiary.GlobalAppStore
import app.gedama.tutorial.cruddiary.adapter.PersonItemAdapter
import app.gedama.tutorial.cruddiary.database.CrudDiaryDatabase
import app.gedama.tutorial.cruddiary.databinding.FragmentPersonsListBinding
import app.gedama.tutorial.cruddiary.viewmodel.PersonsListViewModel
import app.gedama.tutorial.cruddiary.viewmodel.PersonsListViewModelFactory
class PersonsListFragment : BaseFragment() {
    private var _binding: FragmentPersonsListBinding? = null
    private val binding get() = _binding!!
    override fun onCreateView(
        inflater: LayoutInflater, container: ViewGroup?,
        savedInstanceState: Bundle?
    ): View {
        _binding = FragmentPersonsListBinding.inflate(inflater, container, false)
        val view = binding.root
        val application = requireNotNull(this.activity).application
        val personDao = CrudDiaryDatabase.getInstance(application).personDao
        val viewModelFactory = PersonsListViewModelFactory(personDao)
        val viewModel = ViewModelProvider(this, viewModelFactory)[PersonsListViewModel::class.java]
        binding.viewModel = viewModel
        binding.lifecycleOwner = viewLifecycleOwner
        val adapter = PersonItemAdapter { personId ->
            viewModel.onItemClicked(personId)
        }
        binding.personsList.adapter = adapter
        // set adapter for search view in toolbar
        GlobalAppStore.someFilterableAdapter = adapter
        activateAddFAB({ viewModel.addItem() })
        viewModel.persons.observe(viewLifecycleOwner, Observer {
            it?.let {
                adapter.submitList(it)
            }
        })
        viewModel.persons.observe(viewLifecycleOwner, Observer {
            it?.let {
                adapter.setData(it.toMutableList())
                if ( it.size == 0 ) {
                    binding.noEntriesTextId.visibility = View.VISIBLE
                    binding.personsList.visibility = View.GONE
                } else {
                    binding.noEntriesTextId.visibility = View.GONE
                    binding.personsList.visibility = View.VISIBLE
                }
            }
        })
        adapter.adapterSize.observe( viewLifecycleOwner, { it ->
            if ( it == 0 ) {
                binding.noEntriesTextId.visibility = View.VISIBLE
                binding.personsList.visibility = View.GONE
            } else {
                binding.noEntriesTextId.visibility = View.GONE
                binding.personsList.visibility = View.VISIBLE
            }
        })
        return view
    }
    override fun onDestroyView() {
        super.onDestroyView()
        _binding = null
        deactivateAddFAB()
    }
}

This code is similar to the one for displaying genders. However, we check for the size of the person list and depending on its size we toggle the visibility of our empty list info textview. Furthermore, we set the adapter in the GlobalAppStore’s someFilteralbeAdapter variable. As a last step we have to extend our navigation file nav_graph.xml with our new fragment and define actions for the navigation transitions from the home fragment and back (either in the graphical editor or directly in the XML code):

12.9 nav_graph.xml

Listing 76: nav_graph.xml
<?xml version="1.0" encoding="utf-8"?>
<navigation xmlns:android="http://schemas.android.com/apk/res/android"
    xmlns:app="http://schemas.android.com/apk/res-auto"
    xmlns:tools="http://schemas.android.com/tools"
    android:id="@+id/nav_graph"
    app:startDestination="@id/homeFragment">
    <fragment
        android:id="@+id/homeFragment"
        android:name="app.gedama.tutorial.cruddiary.fragment.HomeFragment"
        android:label="@string/main_menu_title" >
        <action
            android:id="@+id/action_homeFragment_to_gendersListFragment"
            app:destination="@id/gendersListFragment" />
        <action
            android:id="@+id/action_homeFragment_to_personsListFragment"
            app:destination="@id/personsListFragment" />
    </fragment>
    <fragment
        android:id="@+id/gendersListFragment"
        android:name="app.gedama.tutorial.cruddiary.fragment.GendersListFragment"
        android:label="@string/genders_list_menu_title"
        tools:layout="@layout/fragment_genders_list" >
        <action
            android:id="@+id/action_gendersListFragment_to_homeFragment"
            app:destination="@id/homeFragment" />
        <action
            android:id="@+id/action_gendersListFragment_to_addGenderFragment"
            app:destination="@id/addGenderFragment" />
        <action
            android:id="@+id/action_gendersListFragment_to_updateGenderFragment"
            app:destination="@id/updateGenderFragment" />
    </fragment>
    <fragment
        android:id="@+id/addGenderFragment"
        android:name="app.gedama.tutorial.cruddiary.fragment.AddGenderFragment"
        android:label="@string/genders_add_menu_title" >
        <action
            android:id="@+id/action_addGenderFragment_to_gendersListFragment"
            app:destination="@id/gendersListFragment"
            app:popUpTo="@id/homeFragment" />/>
    </fragment>
    <fragment
        android:id="@+id/updateGenderFragment"
        android:name="app.gedama.tutorial.cruddiary.fragment.UpdateGenderFragment"
        android:label="@string/genders_update_menu_title" >
        <action
            android:id="@+id/action_updateGenderFragment_to_gendersListFragment"
            app:destination="@id/gendersListFragment"
            app:popUpTo="@id/homeFragment" />/>
        <argument
            android:name="genderId"
            app:argType="long" />
    </fragment>
    <fragment
        android:id="@+id/personsListFragment"
        android:name="app.gedama.tutorial.cruddiary.fragment.PersonsListFragment"
        android:label="@string/persons_list_menu_title"
        tools:layout="@layout/fragment_persons_list" >
        <action
            android:id="@+id/action_personsListFragment_to_homeFragment"
            app:destination="@id/homeFragment" />
    </fragment>
</navigation>

With all these new files and extensions of existing files, the code should now rebuild and run on a (virtual) device. If you tap on the menu item ’Persons’ in the main menu, an info is shown that there are no persons in the database yet (see Figure 12.1). At the bottom right you can see the FAB with which we will be able to add a new person in the next chapter.
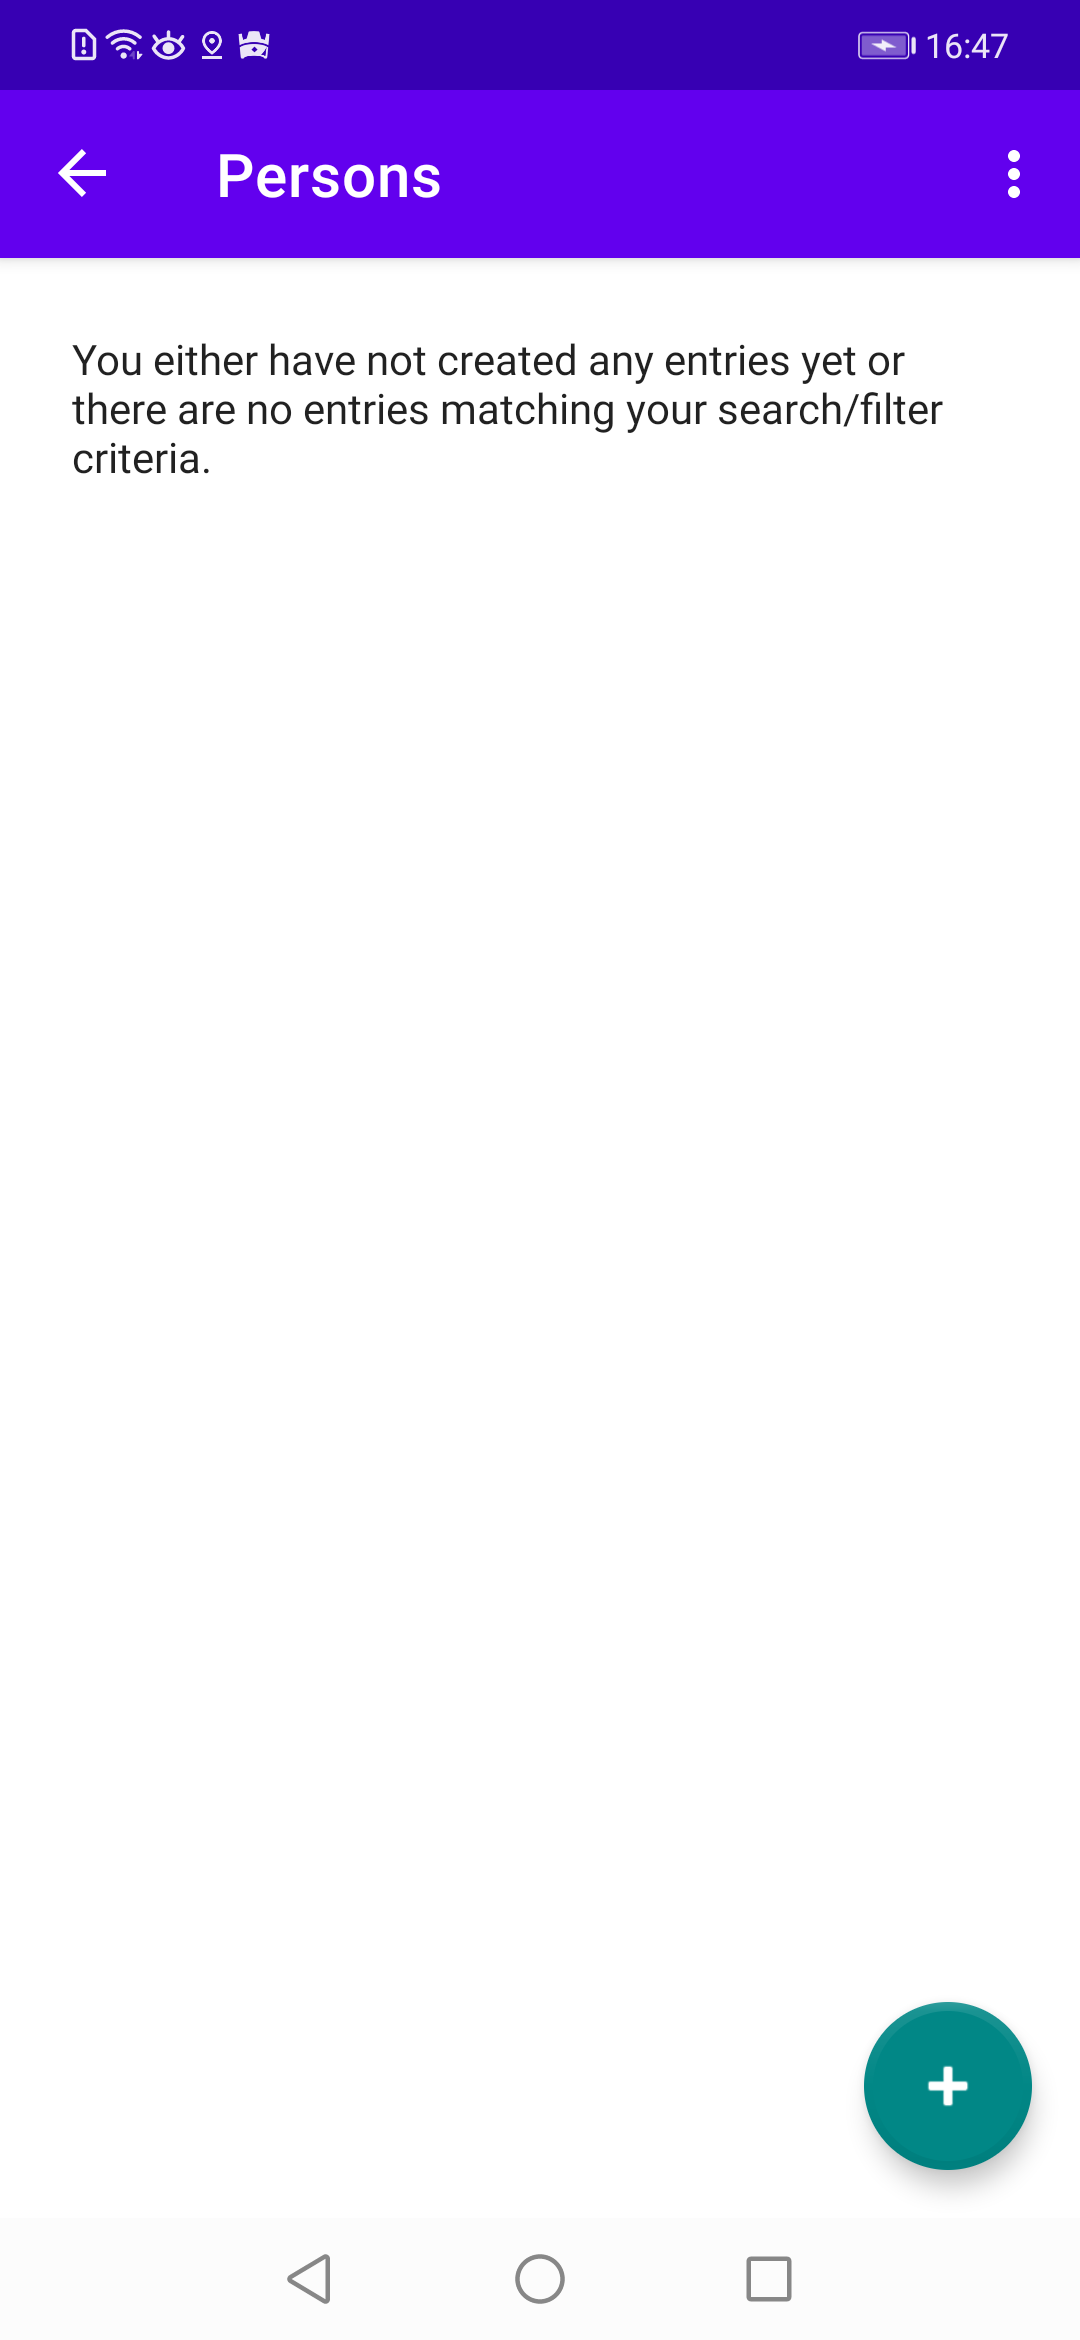
Empty persons list
Figure 12.1: Empty persons list