How to Build a CRUD App With Kotlin and Android Studio

Chapter 9 Menu Item ”Genders”

Problems covered in this chapter
  • Defining attributes in our themes

  • Basic viewmodel class with useful methods for all other view models

  • Basic fragment class with useful methods for all further fragments

  • Styles to unify the user interface

In this chapter we want to realise the display of the genders, which is shown when the user taps the menu item ”Gender” in the main menu. The display is done in a separate fragment GendersFragment.kt, whose user interface (UI) is defined in the layout file fragment_genders_list.xml. This XML file essentially consists of a RecyclerView element that fills its contents with the help of the additional layout file gender_item.xml and the adapter GenderItemAdapter.kt. Parallel to the fragment GendersFragment.kt we also create a ViewModel GendersListViewModel.kt. As already familiar from the previous chapters, we also have to extend our build.xml file and our navigation graph with additionally required elements.

9.1 build.xml (App)

Listing 31: build.xml
...
    kotlinOptions {
        jvmTarget = ’17’
    }
    buildFeatures {
        dataBinding true
    }
}
dependencies {
...
kapt "androidx.room:room-compiler:$room_version"
implementation ’androidx.recyclerview:recyclerview:1.3.0’
implementation ’androidx.cardview:cardview:1.0.0’
implementation "androidx.navigation:navigation-fragment-ktx:$nav_version"
...
}

With these additional dependencies, we enable RecyclerViews and CardViews, which are used to display our data from the database in the form of scrollable lists. We also activate DataBinding.

9.2 themes.xml (Light-Mode)

Listing 32: themes.xml (Dark-Mode)
...
<style name="CrudDiary_LinearLayoutCompat_CardView" parent="Widget.MaterialComponents.CardView">
    <item name="android:layout_width">match_parent</item>
    <item name="android:layout_height">wrap_content</item>
    <item name="android:layout_margin">8dp</item>
    <item name="cardElevation">4dp</item>
    <item name="cardCornerRadius">4dp</item>
</style>
<style name="CrudDiary_LinearLayoutCompat_CardView_Single_Text" parent="Theme.CrudDiary">
    <item name="android:layout_width">match_parent</item>
    <item name="android:layout_height">wrap_content</item>
    <item name="android:minHeight">50dp</item>
    <item name="android:gravity">center_vertical</item>
    <item name="android:textStyle">bold</item>
    <item name="android:padding">8dp</item>
    <item name="android:textSize">16sp</item>
</style>
...

For the uniform display of data from the database in RecyclerViews we use a few styles, so we extend themes.xml with the above lines.

9.3 GlobalAppStore.kt

Listing 33: GlobalAppStore.kt
        const val APP_DB_NAME = APP_PREFIX + "database"
        var _showInactive = MutableLiveData(false)
        val showInactive: LiveData<Boolean>
            get() = _showInactive
    }
}

In our globally accessible class GlobalAppStore we define a variable _showInactive that reflects whether deactivated elements should be displayed or not (can be set in the settings).

9.4 GendersListViewModel.kt

Listing 34: GendersListViewModel.kt
package app.gedama.tutorial.cruddiary.viewmodel
import androidx.lifecycle.LiveData
import androidx.lifecycle.ViewModel
import androidx.lifecycle.ViewModelProvider
import androidx.lifecycle.switchMap
import app.gedama.tutorial.cruddiary.GlobalAppStore
import app.gedama.tutorial.cruddiary.dao.GenderDao
import app.gedama.tutorial.cruddiary.data.Gender
class GendersListViewModel(genderDao: GenderDao) : BaseViewModel()  {
    private val showDeactivated = GlobalAppStore._showInactive
    val genders: LiveData<List<Gender>>
    init {
        genders = showDeactivated.switchMap { showDeactivated ->
            genderDao.getAllGenders(1L, showDeactivated)
        }
    }
}
class GendersListViewModelFactory(private val genderDao: GenderDao) : ViewModelProvider.Factory {
    override fun <T : ViewModel> create(modelClass: Class<T>): T {
        if (modelClass.isAssignableFrom(GendersListViewModel::class.java)) {
            return GendersListViewModel(genderDao) as T
        }
        throw java.lang.IllegalArgumentException("Unknown ViewModel")
    }
}

In the class GendersListViewModel() we define the LiveData variable genders, which returns all genders contained in the database. The value 1L is passed to the getAllGenders() method so that the dummy value ”—” is not displayed in our RecyclerView. And depending on the variable showDeactivated, deactivated genders are displayed or not.

Furthermore, the ViewModelFactory GendersListViewModelFactory is defined in the same file, which gets our GenderDao class as a parameter, so that we can access the database in the ViewModel.

9.5 BaseViewModel.kt

As can be seen in the ViewModel file GendersListViewModel above, it inherits from BaseViewModel.kt, a class into which we put variables and methods used in many ViewModel classes.

Listing 35: BaseViewModel.kt
package app.gedama.tutorial.cruddiary.viewmodel
import androidx.lifecycle.LiveData
import androidx.lifecycle.MutableLiveData
import androidx.lifecycle.ViewModel
abstract class BaseViewModel: ViewModel() {
    val TAG = this::class.simpleName
    val _navigateToList = MutableLiveData(false)
    val navigateToList: LiveData<Boolean>
        get() = _navigateToList
    val _navigateToAddItem = MutableLiveData(false)
    val navigateToAddItem: LiveData<Boolean>
        get() = _navigateToAddItem
    val _navigateToEditItem= MutableLiveData<Long?>()
    val navigateToEditItem: LiveData<Long?>
        get() = _navigateToEditItem
    fun addItem() {
        _navigateToAddItem.value = true
    }
    fun onNavigatedToList() {
        _navigateToList.value = false
    }
    fun onItemClicked(itemId: Long) {
        _navigateToEditItem.value = itemId
    }
    fun onItemAddNavigated() {
        _navigateToAddItem.value = false
    }
    fun onItemEditNavigated() {
        _navigateToEditItem.value = null
    }
}

The MutableLiveData, its associated LiveData variables and the corresponding methods are used for navigation purposes. With their help, the fragments and their associated ViewModels inform each other whether a user has tapped a certain button (e.g. ’Add’ button) and therefore a new fragment must be displayed.

Later, we extend this basic class with many more variables and methods that are needed again and again in our ViewModels.

9.6 gender_item.xml

Listing 36: gender_item.xml
<?xml version="1.0" encoding="utf-8"?>
<layout
    xmlns:android="http://schemas.android.com/apk/res/android">
    <data>
        <variable
            name="gender"
            type="app.gedama.tutorial.cruddiary.data.Gender" />
    </data>
    <androidx.cardview.widget.CardView
        android:id="@+id/cardView"
        style="@style/CrudDiary_LinearLayoutCompat_CardView">
        <TextView
            android:id="@+id/gender_name"
            style="@style/CrudDiary_LinearLayoutCompat_CardView_Single_Text"
            android:text="@{gender.name}"/>
    </androidx.cardview.widget.CardView>
</layout>

The layout file gender_item.xml defines how our gender elements from the database are displayed in the RecyclerView. For this purpose, we use a CardView that is visually equipped by means of styles previously defined in themes.xml. In this case, only the name of the gender is displayed (e.g. ”female”). In later item files, the display will be somewhat more extensive, in particular images will be used in the display. The data binding variable gender is defined by means of the data-element, which we access a little further down in the code for our GenderItemAdapter.

9.7 fragment_genders_list.xml

Listing 37: fragment_genders_list.xml
<?xml version="1.0" encoding="utf-8"?>
<layout
    xmlns:android="http://schemas.android.com/apk/res/android"
    xmlns:app="http://schemas.android.com/apk/res-auto"
    xmlns:tools="http://schemas.android.com/tools"
    tools:context=".fragment.GendersListFragment">
    <data>
        <variable
            name="viewModel"
            type="app.gedama.tutorial.cruddiary.viewmodel.GendersListViewModel" />
    </data>
    <LinearLayout
        android:layout_width="match_parent"
        android:layout_height="match_parent"
        android:orientation="vertical">
        <androidx.recyclerview.widget.RecyclerView
            android:id="@+id/genders_list"
            android:layout_width="match_parent"
            android:layout_height="0dp"
            android:layout_weight="1"
            android:gravity="top"
            app:layoutManager="androidx.recyclerview.widget.StaggeredGridLayoutManager" />
    </LinearLayout>
</layout>

In fragment_genders_list.xml, a RecyclerView is used to display our genders. By means of the data-element, the variable viewModel is defined, which we access in the code in our fragment FragmentGendersList.kt, which we will deal with next.

9.8 FragmentGendersList.kt

Listing 38: FragmentGendersList.kt
package app.gedama.tutorial.cruddiary.fragment
import android.os.Bundle
import android.view.LayoutInflater
import android.view.View
import android.view.ViewGroup
import androidx.lifecycle.Observer
import androidx.lifecycle.ViewModelProvider
import app.gedama.tutorial.cruddiary.adapter.GenderItemAdapter
import app.gedama.tutorial.cruddiary.database.CrudDiaryDatabase
import app.gedama.tutorial.cruddiary.databinding.FragmentGendersListBinding
import app.gedama.tutorial.cruddiary.viewmodel.GendersListViewModel
import app.gedama.tutorial.cruddiary.viewmodel.GendersListViewModelFactory
class GendersListFragment : BaseFragment() {
    private var _binding: FragmentGendersListBinding? = null
    private val binding get() = _binding!!
    override fun onCreateView(
        inflater: LayoutInflater, container: ViewGroup?,
        savedInstanceState: Bundle?
    ): View {
        _binding = FragmentGendersListBinding.inflate(inflater, container, false)
        val view = binding.root
        val application = requireNotNull(this.activity).application
        val genderDao = CrudDiaryDatabase.getInstance(application).genderDao
        val viewModelFactory = GendersListViewModelFactory(genderDao)
        val viewModel = ViewModelProvider(this, viewModelFactory)[GendersListViewModel::class.java]
        binding.viewModel = viewModel
        binding.lifecycleOwner = viewLifecycleOwner
        val adapter = GenderItemAdapter { genderId ->
            viewModel.onItemClicked(genderId)
        }
        binding.gendersList.adapter = adapter
        activateAddFAB({ viewModel.addItem() })
        viewModel.genders.observe(viewLifecycleOwner, Observer {
            it?.let {
                adapter.submitList(it)
            }
        })
        return view
    }
    override fun onDestroyView() {
        super.onDestroyView()
        _binding = null
        deactivateAddFAB()
    }
}

Here we first initialise the data binding and our GendersListViewModel, which we create via the previously defined ViewModelFactory, which we pass our Genders-DAO class to when we call it. Then our Genders adapter is initialised and assigned to our RecyclerView in fragment_genders_list.xml using data binding. The activateAddFAB() method is defined in the Bais class BaseFragment.kt, which we describe a little further down - this method ensures that the FloatingActionButton for adding new elements (a plus symbol) is displayed at the bottom of the screen. This FAB is defined in activity_main.xml and is invisible there by default. Furthermore, our fragment observes the LiveData variable genders defined in the ViewModel: If this was filled with gender values from the database, the fragment is informed of this and we can pass the list with all gender values (male, female, diverse) to the Genders adapter. In the fragment method onDestroyView(), we call the method deactivateAddFAB(), which sets the FAB, which was previously set to visible, back to invisible.

9.9 BaseFragment.kt

As can be seen in the fragment file GendersListFragment above, it inherits from BaseFragment.kt, a class into which we put variables and methods that are used in many of our fragment classes. It is thus similar to our BaseViewModel class, which does the same for our ViewModels.

Listing 39: BaseFragment.kt
package app.gedama.tutorial.cruddiary.fragment
import app.gedama.tutorial.cruddiary.R
import androidx.core.view.isVisible
import androidx.fragment.app.Fragment
import com.google.android.material.floatingactionbutton.FloatingActionButton
abstract class BaseFragment: Fragment() {
    fun activateAddFAB(viewModelFunc: () -> Unit ) {
        val fab = this.requireActivity().findViewById<FloatingActionButton>(R.id.add_floating_action_button)
        fab.isVisible = true
        fab.setOnClickListener { viewModelFunc() }
    }
    fun deactivateAddFAB() {
        val fab = this.requireActivity().findViewById<FloatingActionButton>(R.id.add_floating_action_button)
        fab.isVisible = false
    }
}

For now, only our two methods for showing and hiding a floating action button are defined there. Later, we will extend this basic class with lots of additional variables and methods. Next, we need an adapter to display our gender data in the RecyclerView.

9.10 GenderItemAdapter.kt

Listing 40: GenderItemAdapter.kt
package app.gedama.tutorial.cruddiary.adapter
import android.util.TypedValue
import android.view.LayoutInflater
import android.view.ViewGroup
import androidx.recyclerview.widget.DiffUtil
import androidx.recyclerview.widget.ListAdapter
import androidx.recyclerview.widget.RecyclerView
import app.gedama.tutorial.cruddiary.data.Gender
import app.gedama.tutorial.cruddiary.R
import app.gedama.tutorial.cruddiary.databinding.GenderItemBinding
class GenderItemAdapter(val clickListener: (vaccinationTypeId: Long) -> Unit): ListAdapter<Gender, GenderItemAdapter.GenderItemViewHolder>(GenderDiffItemCallback()) {
    override fun onCreateViewHolder(parent: ViewGroup, viewType: Int): GenderItemViewHolder =
        GenderItemViewHolder.inflateFrom(parent)
    override fun onBindViewHolder(holder: GenderItemViewHolder, position: Int) {
        val item = getItem(position)
        holder.bind(item, clickListener)
    }
    class GenderItemViewHolder(val binding: GenderItemBinding) : RecyclerView.ViewHolder(binding.root) {
        companion object {
            fun inflateFrom(parent: ViewGroup) : GenderItemViewHolder {
                val layoutInflater = LayoutInflater.from(parent.context)
                val binding = GenderItemBinding.inflate(layoutInflater, parent, false)
                return GenderItemViewHolder(binding)
            }
        }
        fun bind(item: Gender, clickListener: (vaccinationTypeId: Long) -> Unit) {
            binding.gender = item
            binding.root.setOnClickListener {
                clickListener(item.genderId)
            }
            if (item.inactive) {
                val typedValue = TypedValue()
                binding.root.context.theme.resolveAttribute(R.attr.inactive_background_color, typedValue, true)
                binding.cardView.setCardBackgroundColor(typedValue.data)
            } else {
                val typedValue = TypedValue()
                binding.root.context.theme.resolveAttribute(
                    R.attr.active_background_color, typedValue, true)
                binding.cardView.setCardBackgroundColor(typedValue.data)
            }
        }
    }
}
class GenderDiffItemCallback : DiffUtil.ItemCallback<Gender>() {
    override fun areItemsTheSame(oldItem: Gender, newItem: Gender) = (oldItem.genderId == newItem.genderId)
    override fun areContentsTheSame(oldItem: Gender, newItem: Gender) = (oldItem == newItem)
}

This adapter code is essentially taken from Head First Android Programming and is very similar in structure for all our data classes. Only the code in the bind method of the GenderItemViewHolder is worth mentioning: By means of DataBinding, the variable gender from gender_item.xml is accessed here and it is checked whether the displayed element has been deactivated by the user. If this is the case, the item is displayed in the list with shading. The additional class GenderDiffItemCallback is used so that the adapter can decide whether two elements are identical.

9.11 nav_graph.xml

As a last step we have to extend our navigation file nav_graph.xml with our new fragment and define actions for the navigation transitions from the home fragment and back (either in the graphical editor or directly in the XML code):

Listing 41: nav_graph.xml
<?xml version="1.0" encoding="utf-8"?>
<navigation xmlns:android="http://schemas.android.com/apk/res/android"
    xmlns:app="http://schemas.android.com/apk/res-auto"
    xmlns:tools="http://schemas.android.com/tools"
    android:id="@+id/nav_graph"
    app:startDestination="@id/homeFragment">
    <fragment
        android:id="@+id/homeFragment"
        android:name="app.gedama.tutorial.cruddiary.fragment.HomeFragment"
        android:label="fragment_home" >
        <action
            android:id="@+id/action_homeFragment_to_gendersListFragment"
            app:destination="@id/gendersListFragment" />
    </fragment>
    <fragment
        android:id="@+id/gendersListFragment"
        android:name="app.gedama.tutorial.cruddiary.fragment.GendersListFragment"
        android:label="fragment_genders_list"
        tools:layout="@layout/fragment_genders_list" >
        <action
            android:id="@+id/action_gendersListFragment_to_homeFragment"
            app:destination="@id/homeFragment" />
    </fragment>
</navigation>

With all these new files and extensions of existing files, the code should now rebuild and run on a (virtual) device. If you tap on the menu item ’Gender’ in the main menu, our three elements from the database are shown (see Figure 9.1). At the bottom right you can see the FAB with which we will be able to add a new gender in the next chapter.
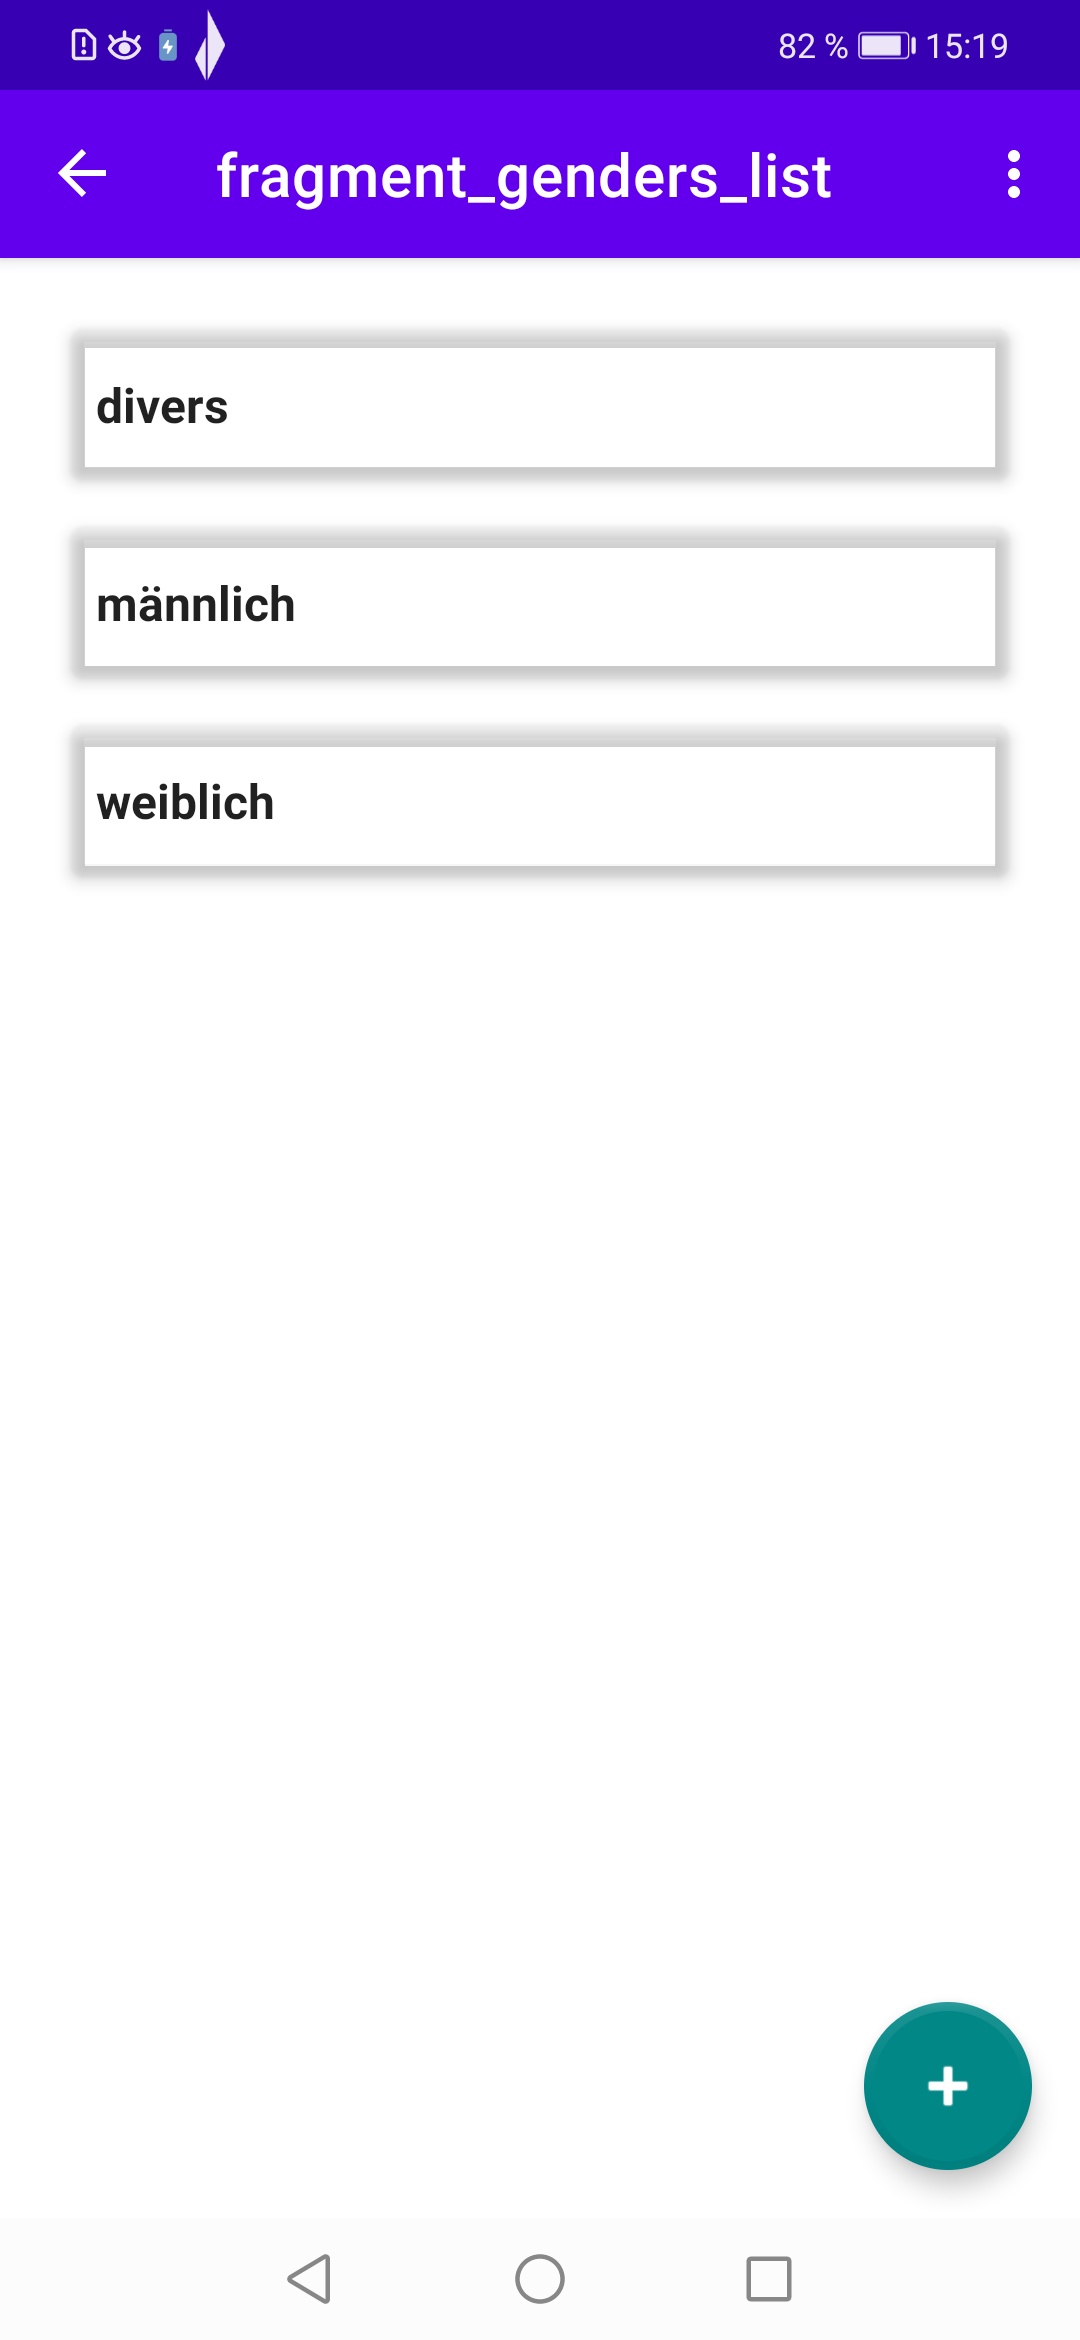
Genders list
Figure 9.1: Genders list